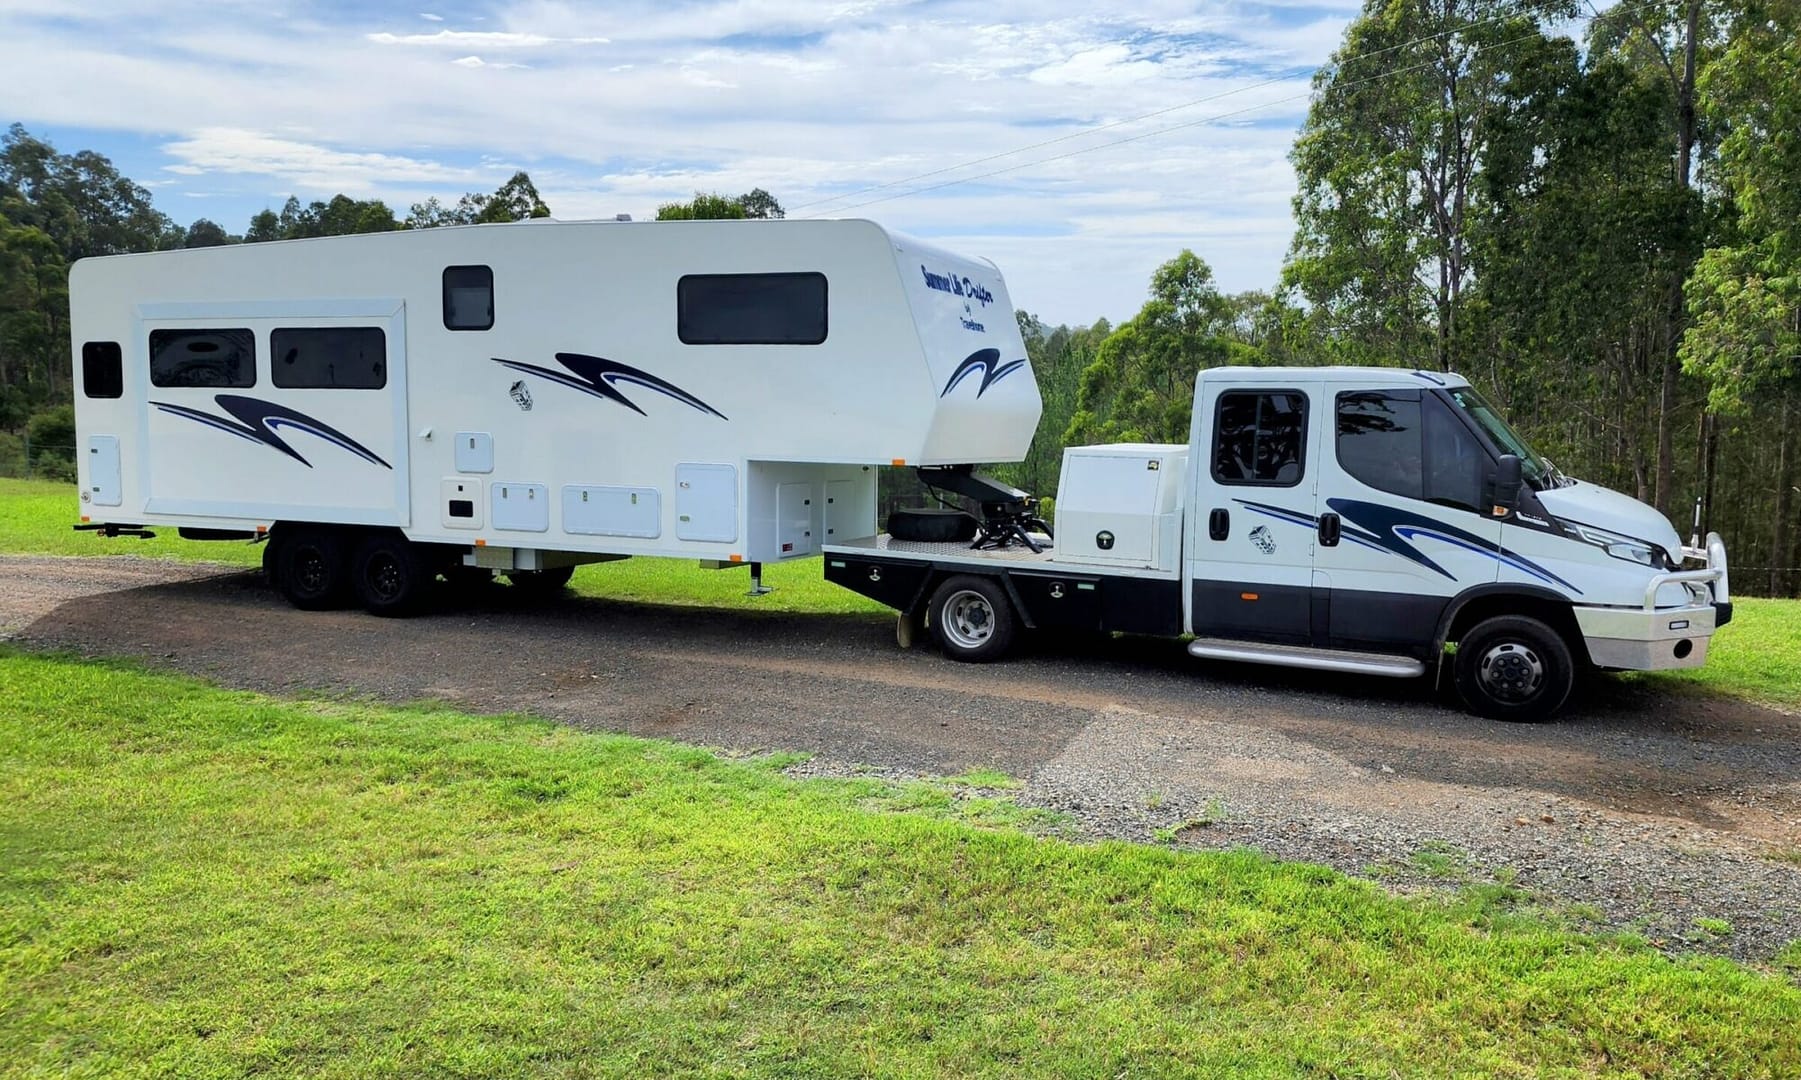
This is part one of ?two? that describe how I’ve managed to cobble together tracking the location of our van, the CARDIS. This post describes the configuration of the Teltonika router in the CARDIS to output GPS coordinates in a format that is vaguely reasonable to use without investing in a full-blown AVL1 system.
Router capabilities
The Teltonika RUTX11 is one of a range of Teltonika’s industrial-grade routers that has GNSS (location tracking capabilities built-in). It also has a range of other, industrial-oriented features such as support for Modbus and MQTT, as well as Bluetooth.
Required output
As noted above, I didn’t really want to build/install/maintain a full AVL system—firstly it’s overkill for this really straightforward requirement and more importantly, it would need to be a hosted system to ensure half-way reasonable uptime/reliability and that starts to become complex and expensive (relatively speaking, against our very limited budget). We already maintain a hosted system that runs this website and our family tree software, so using it seemed to have some advantages. As such, I hunted around for a WordPress plugin that seemed to meet the need and settled on “Trackserver” (not that there is actually a huge number of relevant ones out there so far as I could find).
Trackserver (being tied to WordPress) requires HTTP(S) input, but recognises and accepts a fairly wide range of formats and message structures: mostly relating to other commercial or open-source tracking systems or devices. Unfortunately from my perspective, documentation of these formats seemed somewhat scarce (read essentially non-existent), which made it rather difficult to set a target for what was needed out of the Teltonika.
Eventually I got to the point that I could get, and should be able to configure Trackserver to use, an HTTP POST with a JSON payload.
Teltonika GPS output
Sadly, the doco around the Teltonika router functions, while reasonably comprehensive, seems to have been written by an engineer with English not as their primary language. By this I mean that although the doco is technically correct, it almost always stops short of fully describing the function in context. For example, there are lots of points similar to: “The On/Off slider is used to enable or disable function_xxx. When the slider is in the “On’ position, function_xxx is enabled.” This is 100% technically correct, but hardly useful unless you already know what exactly function_xxx actually does. And if I knew what function_xxx did, I really wouldn’t need instruction on how to use a web-interface slide switch! Add in the occasionally fractured grammar…
Anyhow – end of rant.
Screenshots in this post are from v7.06.6 of the firmware, which seems a little less user friendly than the previous one; although it does seem to have improved stability of the system, which is a really good thing :).
The Teltonika router appears to have several ways of getting GPS info out to an external system:
- Services > GPS > NMEA:- this seems to offer options for sending (forwarding) NMEA standard messages (sentences) as a non-HTTP variant of TCP. It was unclear if sending to port 80 would actually mimic HTTP, and in any case the NMEA sentences require translation before use and I could not find any relevant WordPress plugins for this. See Figure 1 below for an example of the output (only 2 of the 5 available GPS sentences shown);
xxx_$GPGGA,033556.00,3234.183529,S,15110.168645,E,1,00,0.9,65.3,M,26.8,M,,*4C
xxx_$GPRMC,033556.00,A,3234.183529,S,15110.168645,E,0.0,66.8,220424,4.4,E,A*1A
Figure 1: NMEA output
- Services > GPS > HTTPS: promising, however no matter how I configured this I could not get it to send anything other than the full suite of sentences whether they had collected any data or not, plus the same issue with translation of the NMEA data noted above. Also seemed to send 10 or 12 sets of the data at once. See Figure 2 below for a truncated example of the output;
$GPGSV,4,1,15,03,47,000,40,04,65,135,37,06,09,257,28,07,31,277,36,1*62
$GPGSV,4,2,15,08,07,036,32,09,47,216,43,16,49,111,46,26,21,135,26,1*68
$GPGSV,4,3,15,27,11,068,42,30,03,288,38,11,00,224,,31,06,120,,1*60
$GPGSV,4,4,15,41,,,41,43,,,41,50,,,34,1*60
$GPGGA,035907.00,3234.183009,S,15110.168591,E,1,00,1.0,66.7,M,26.8,M,,*40
$GPVTG,37.4,T,32.9,M,0.0,N,0.0,K,A*2B
$GPRMC,035907.00,A,3234.183009,S,15110.168591,E,0.0,37.4,220424,4.4,E,A*11
$GPGSA,A,1,,,,,,,,,,,,,,,*1E
Figure 2: HTTPS output
- Services > GPS > AVL: presumably for use with a proper AVL system; in fact I managed to get it working with Ruhavik (which I know nothing about other than it seems―at time of drafting—to be free for limited personal use). As for the NMEA option above, it appears to use a non-HTTP variant of TCP;
- Services > MQTT: again, seemed promising as it can access/transmit GPS data, however it is definitely *NOT* HTTP and the only general MQTT plugin I could find for WordPress was very much a developmental work in progress;
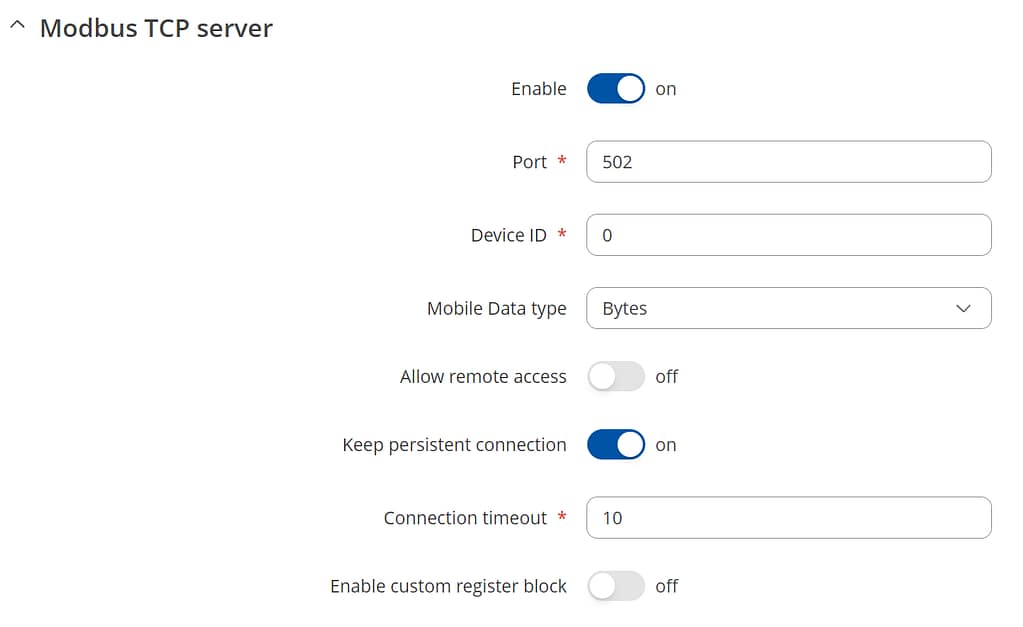
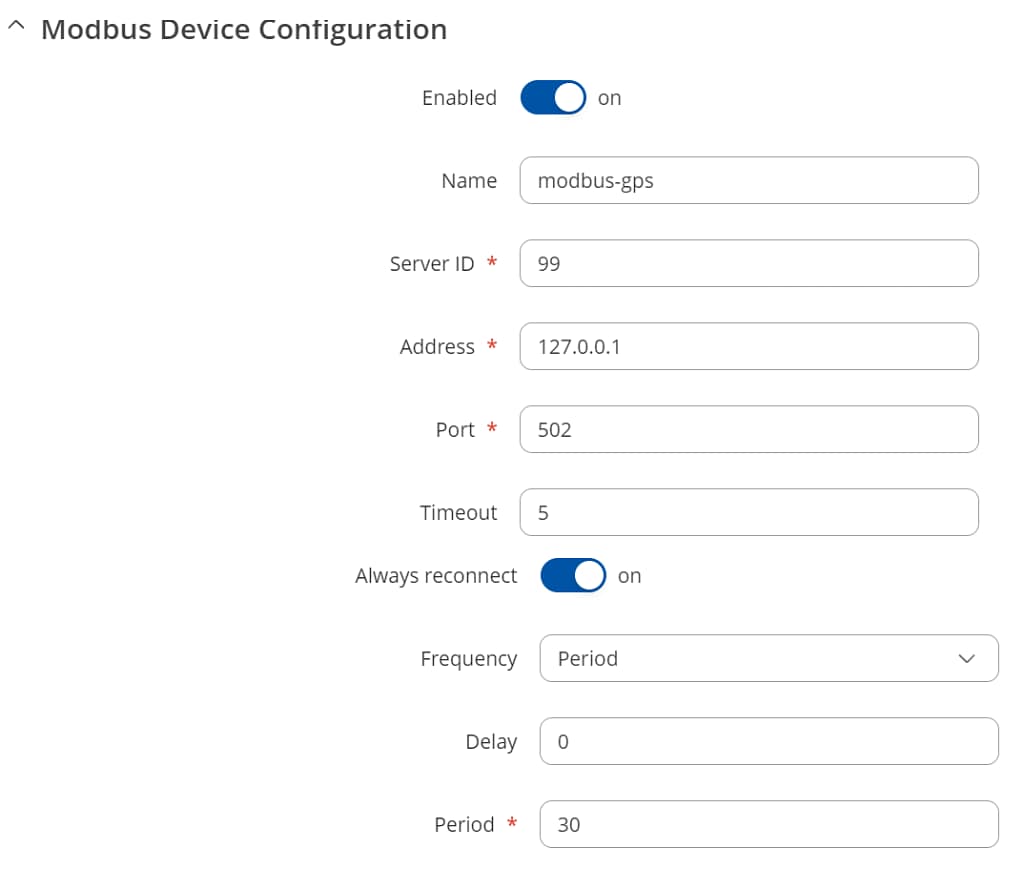
- Services > Modbus > Modbus TCP Server & Services > Modbus > Modbus TCP Client: I’ve never had anything to do with Modbus previously, but this seemed promising, especially as it can read/transmit GPS selected data;
- Services > Data to Server: offers translators/connectors between Modbus and HTTP—seems to be just what we need 🙂
As it turns out, after extensive reading and piecing together various forum questions/answers, what I needed is the last two of these together.
Modbus Configuration: Server
Modbus Configuration: Client

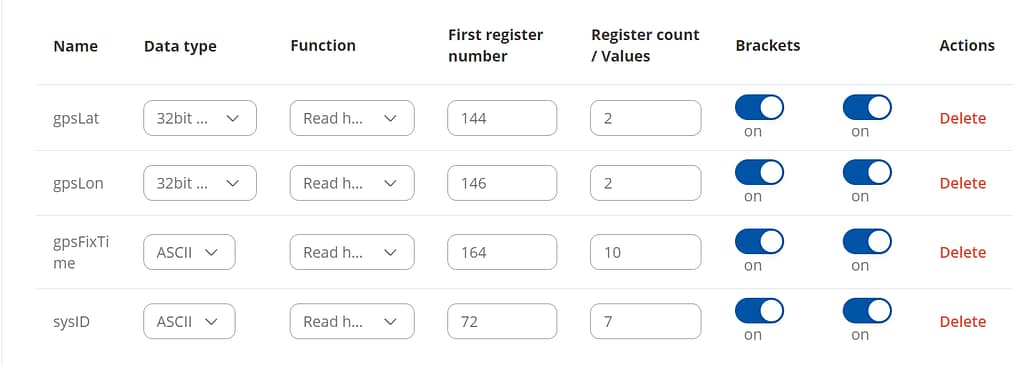
Data to Server Configuration
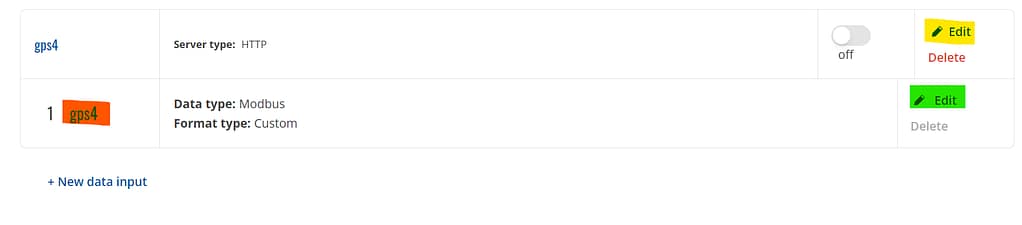
Note that the RED highlight above is merely a label and isn’t particularly critical, it’s just used as per Figure 8, below. The YELLOW and GREEN highlight details are shown in Figures 8 and 9 respectively.
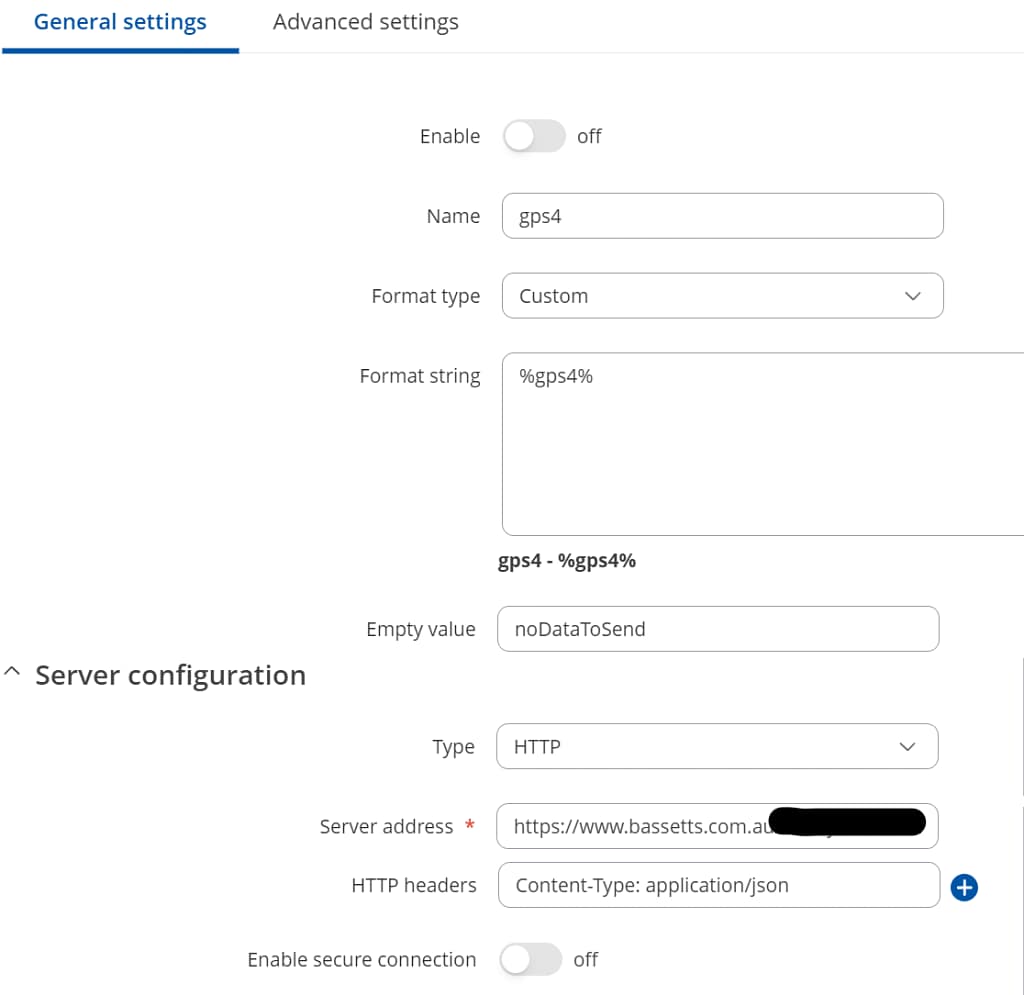
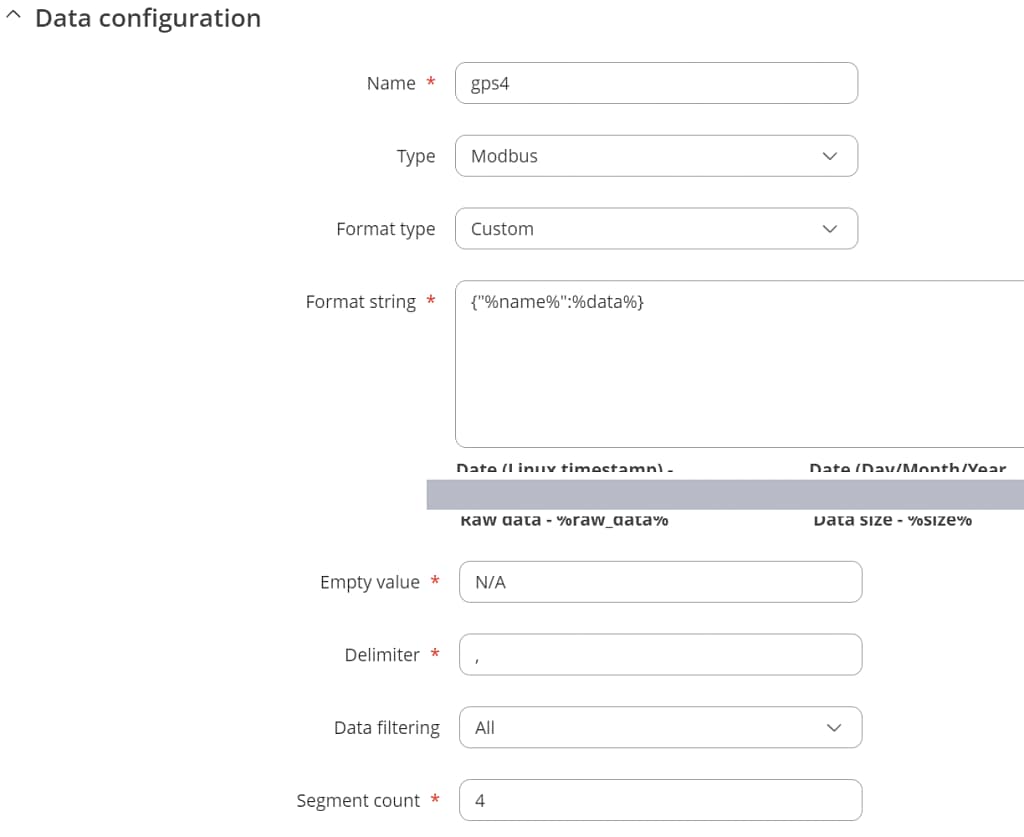
What comes out from all that
When configured as above, the output is an HTTP POST with a JSON payload, as follows:
POST / HTTP/1.1
Host: 19.58.19.602
Accept: */*
Content-Type: application/json
Content-Length: 118

{"gpsLat":-33.83xxxx3},
{"gpsLon":151.00xxxx4},
{"gpsFixTime":"2024-04-03 22:31:08\u0000"},
{"sysID":"CARDIS-RUTX11\u0000"}
Part two of this story will describe the changes and setup of the Trackserver WordPress plugin (when it’s up and running!)